
This page is a step-by-step on how to set up Telestream’s Wirecast Encoder for LIVE broadcast on SermonAudio using the new webcasting settings. For more on what other options are available and what is needed to set up your account for webcasting visit our webcasting help page. If you do not yet have the Wirecast Encoder installed on your system you will need to do so before beginning this tutorial. You may download the trial version for testing at the link above.
Step 1: Make sure your account is Webcast-Enabled
To enable your account for LIVE webcast visit Webcast Manager section in the Broadcaster Dashboard on the website. The link for this section can be found near the bottom of the main menu on the left-hand side of the website.

If you have not yet enabled your account for webcasting with us you will be presented with the terms of service. Once you have agreed to these your stream key will be generated and displayed along with the server address needed to stream to our service.
You will need to have your account webcast enabled before you will be assigned a stream key.
Once set up you will be able to initiate a webcast anytime you want and as often as you want. (note: there is a 10-hour max run time for any single webcast.) The site will automatically detect your webcast and activate the notification buttons on-site and (if you have one of our embed codes installed) on your church website as well!
You will need to verify that you have been set up for webcasting and get the webcast server address and stream key at this point. Cutting and pasting are the best as it removes the chance for a typo.
The copy buttons make it easy!

Your server address will be either rtmp://webcast.sermonaudio.com/sa or rtmp://multicast.sermonaudio.com/sa depending on which option you choose.
The Stream Key will be like the one above where the long string of characters is replaced with your actual Stream Key.
Step 2: Start the Wirecast Encoder.
Next, you will need to start the Wirecast Encoder program on your computer. This is a very powerful paid tool from Telestream that you can purchase or download a trial copy of here!
For a less expensive (FREE) option see our help page on Webcasting with OBS Studio.
Step 3: Next, create a Stream (Output Destination)

From the menu at the top select the OUTPUT and then OUTPUT SETTINGS from the drop-down menu. (You can also hit CTRL + Y on your keyboard to open the window.)
You will be asked to create a new “Output Destination” just click OK.
You can simply cut and paste the Webcast Server URL to the settings page, to eliminate the possibility of a typo.
The server address will be:
rtmp://webcast.sermonaudio.com/sa or rtmp://multicast.sermonaudio.com/sa
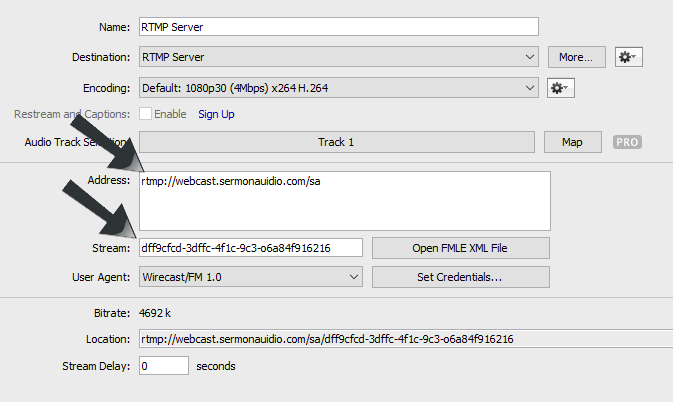
Type or cut and paste the server address into the ADDRESS field and the Stream Key into the STREAM field in the encoder like the example below.
The stream key listed in the example above is only for demonstration it is not a valid key. Your Stream Key identifies and validates your credentials on the site and is unique to your account. Please be sure to use the key listed on your Members Only page.
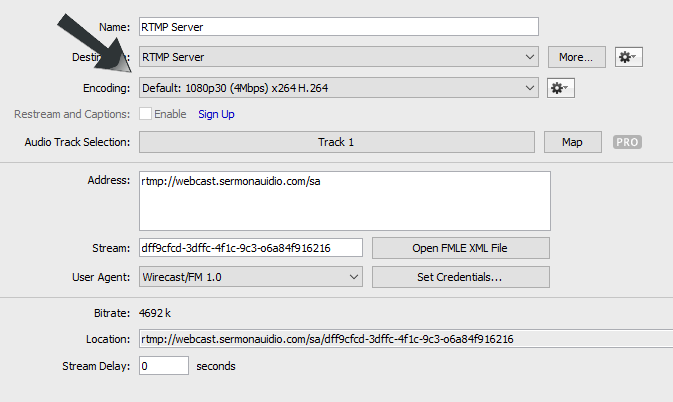
Step 4: Selecting an Encoding Preset
Next, you need to set the bandwidth bitrate and resolution of your outgoing stream. What you select here will depend on your local setup, in particular, your available bandwidth and CPU capability.
- IMPORTANT!! It is imperative that your upload bandwidth speed is fast enough to ensure a smooth and successful webcast. Find out what your upload bandwidth speed is at your location. Your upload bandwidth speed should be at least double the actual bitrate of the stream you send us.
- Do not send Multiple Streams. When you stream we will create multiple streams at different bitrates for the viewer to choose from and the player will automatically default to switch seamlessly between them to match the user’s available bandwidth.
Once you have entered your stream key, server and bitrate settings be sure to click on the SAVE button to save your settings for later use.
Step 5: Saving the event to disk for Archive. (optional)
Please note that even though SermonAudio does save an archive of your live webcasts for two weeks it is still good practice to record the stream locally. You can normally create a sermon from the archive and post it to the site without the need for a lengthy upload but In the event that you need to upload a copy of the live session once it has completed, you will be glad to have to set your encoder to record locally.
To save a copy of your live event to your local hard drive for archival purposes or to upload to SermonAudio you will need to create one more Output Destination. To do so, click on the ADD button in the lower left-hand corner of the settings screen as we did before.

In the popup window select one of the RECORD TO DISK options.
You can then set the encoding options to whatever you would like. Keep in mind that the higher you choose to go, the more CPU power and storage it will take.
Step 6: Save your settings
Now that you have everything set up let’s save the settings so you do not need to do this again. To save a Wirecast document that will open the program with all the preset streams and settings that you have entered click on the FILE menu and select SAVE from the drop-down menu. Name your file and save it somewhere you can find it. (i.e. the desktop). Clicking on the file will open Wirecast with all the settings that you have saved.
You are now ready to webcast!
Step 7: Going LIVE!

To begin a Webcast, Press the STREAM button and your webcast will be LIVE and visible on SermonAudio.com!
Before beginning the Live Webcast be sure that all the Output Destinations that you wish to send out are checked on the OUTPUT setup page. If you are going to save an archive to disk be sure that is also checked. But again be sure to only select one outgoing stream to SermonAudio.
When you begin the webcast you will notice that the stats to the right of the STREAM and RECORD buttons will begin to change. To begin RECORDING click on the RECORD button. (you will need to have a “Record to Disk” Output Destination set up and checked on the setup page) A red dot on the stream and record buttons will indicate that you are live and recording.
The site is designed to automatically detect when you are LIVE and will make it clear to all who are on the site that a LIVE webcast is in progress.
Please note it may take up to one minute for SermonAudio to actually detect that you are live. This simply means that the webcast may not appear on the site and in the embed codes for a little bit right at the beginning of the webcast.
In order to STOP the live webcast, simply press the STREAM button again or from the menu at the top choose OUTPUT and then Start/Stop broadcasting and select STOP ALL.
Here are some last-minute important tips to keep in mind!
- Be sure that you do not “tie-up” the bandwidth at your location by trying to watch the webcast over the same connection that the live webcast is currently broadcasting on.
- For video webcasting, do not “disturb” the PC that is doing the video webcast.. using other programs on the same PC can cause issues. You need to keep an eye on your CPU usage and be sure you are not getting to high as it may cause issues with the stream going out to the viewers. In fact, it is best simply to completely leave the PC alone while the webcast is in progress. Video encoding is a CPU-intensive process that can result in the webcast failing if it doesn’t have the computer’s 100% attention.
Welcome to Live Webcasting on SermonAudio.. and enjoy!
Feel free to contact us if you have any questions about this service.